- Categories:
- IOSDev
- https://github.com/Masonry/Masonry
- XCode AutoLayout
- Categories:
- IOS
- Audio Queues
- XCode
- Microphone Recording
- Categories:
- OpenFrameworks
- IOSDEV
- SOX
RAW audio data are huge. A 3 Seconds recording sampled @ 44100 is about 529 KB in size. Storing it permanently in iphone/android/ipad wouldn’t be a good idea. See (http://stackoverflow.com/questions/22292677/apps-must-follow-the-ios-data-storage-guidelines-or-they-will-be-rejected-in-app)
In OpenFrameworks, as of now there isn’t any great solution to converting audio data to compressed format. Or even uncompressed format for that matter. See (https://github.com/openframeworks/openFrameworks/issues/2511)
- Categories:
- CreativeCoding
- Raw Audio Data
- OpenFrameworks
- Go
- ASIHttpRequest
- IOSDEV
- Categories:
- EXC_BAD_ACCESS
- IOSDEV
- Categories:
- AngularJS
- Google GO
- HTML5
- Web Audio
- Coffeescript
- Categories:
- Google Protobuf
- ProtobufJS
- Binary Wire Data
- Coffeescript
- AngularJS
- Categories:
- Google GO
- Martini Web Framework
- Categories:
- Google Protobuf
- XCode
- OpenFrameworks
- C++
- Reddit Mechanical Keyboard Group
- Tactile Keyboards Group
- CODE Keyboards co-founded by Jeff Atwood.
- Categories:
- Keyboards
- Mecanical Keyboard
- CODE Keyboard
- Categories:
- Freelancing
- ODesk
- Categories:
- Grunt
- NodeJS
- Javascript
- Book Reviews
- 31 August 2014
- Don’t export Android project’s JNI headers.
- 21 April 2014
- Use GitHUB to host the update site.
- Update blog.
- Nov 20 2013
- Updated the plugin to reflect changes for J2ObjC 0.8.7Better progress display
- Easier classpath libraries usage
- Mar 31 2013
- Added feature to export the generated ObjectiveC Files to external directory.
- Better organization of console logs with colors and proper spacing
- Feb 13 2013
- Updated the plugin to reflect changes for J2ObjC 0.6
- Categories:
- Google J2OBJC
- Eclipse
- Java
- Projects
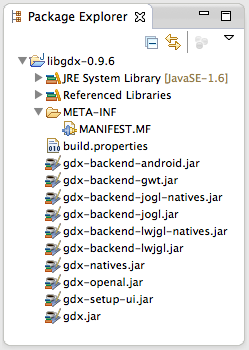
- gdx-backend-lwjgl-natives.jar
- gdx-backend-lwjgl.jar
- gdx-natives.jar
- gdx.jar
- luaj-jse-3.0-alpha2.jar
init(world, cam)- Takes two parameters: Box2D World and the Orthographic Camera. We’ll pass these parameters from Java to Lua.keyPressed(world, cam, body, joint, key)- Parameters: Box2D World, Orthographic Camera, Box2D Body, Box2D Joint, Key Pressed.- To properly pass the parameters from Java to Lua, there’s an excellent method:
CoerceJavaToLua.coerce(object) globals.loadFile(scriptFileName)loads the Lua script and stores it in a variable, saychunk- Once loaded,
chunk.call()must be executed at least once - Functions in Lua script can be obtained via. the
globals.get(functionName)method - Once obtained, functions can be called by using the
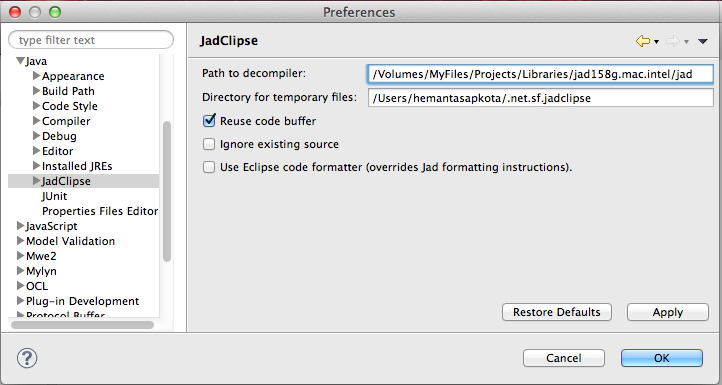
invoke()method Download JAD decompiler from here jad158g.mac.intel.zip and unzip it somewhere in your system
Download JadClipse - the Eclipse plugin for JAD from here http://jadclipse.sourceforge.net/wiki/index.php/Main_Page#Download
Put JadClipse inside the plugins folder of your Eclipse installation
Set up preferences by giving path to the JAD decompiler to the plugin
- Associate JadClipse to .CLASS files
- Categories:
- Google Protobuf
- Eclipse
- Java
- Custom perspective
- A Common Navigator View
- A Form Editor for managing addresses i.e. An Address Book
- Categories:
- Google Protobuf
- Eclipse
- Java
- Categories:
- Google Protobuf
- Eclipse
- Java
Thank God for Masonry - #IOSDev
Wed Oct 15, 2014
Masonry is a framework built on top of Auto Layout for constructing layouts for IOS/OSX. It comes with its own DSL. It’s a boon for constructing layouts for devices of multiple sizes.
Take a look the following layout:
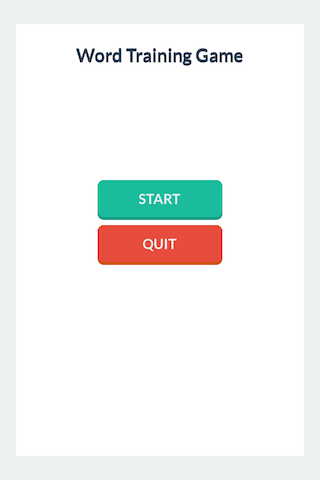
With Masonry, You’d do something like below to code the layout.
menuView = [[UIView alloc] initWithFrame:[MASUtil frame]];
[self.containerView addSubview:menuView];

[menuView makeConstraints:^(MASConstraintMaker *make) {
  make.edges.equalTo(self.containerView);
}];

FUIButton *startBtn = [FlatUIUtil makeSuccessBtn];
[startBtn setTitle:@"START" forState:UIControlStateNormal];
[startBtn addTarget:self action:@selector(onStartPressed:) forControlEvents:UIControlEventTouchUpInside];
[menuView addSubview:startBtn];

[startBtn makeConstraints:^(MASConstraintMaker *make) {
  [self makeBtnWidth:make];
  make.centerX.equalTo(self.childView.centerX);
  make.centerY.equalTo(self.childView.centerY).with.offset([MASUtil makeDim:-40]);
}];

FUIButton *exitBtn = [FlatUIUtil makeDangerBtn];
[exitBtn setTitle:@"QUIT" forState:UIControlStateNormal];
[exitBtn addTarget:self action:@selector(onQuitPressed:) forControlEvents:UIControlEventTouchUpInside];
[menuView addSubview:exitBtn];

[exitBtn makeConstraints:^(MASConstraintMaker *make) {
  [self makeBtnWidth:make];
  make.centerX.equalTo(self.childView.centerX);
  make.top.greaterThanOrEqualTo(startBtn.bottom).with.offset(offy);
}];
Record Microphone Audio into a Float Buffer with AudioQueues - #IOSDEV
Tue Sep 30, 2014
Introduction
This article is a how-to on recording microphone audio into a float buffer using Audio Queues for IOS. The first question then is why would you want to record the data into a float buffer ?
The usual option is to record the data into a file, ex: AIF format. Recording in a float buffer allows you to process the audio data for needs like visualiations, futher processing with algorithms, speech recognition etc.
AudioRecorder.h
#ifndef SpeechBookWormSwift_AudioRecorder_h
#define SpeechBookWormSwift_AudioRecorder_h

#import <Foundation/Foundation.h>
#import <AudioToolbox/AudioQueue.h>
#import <AudioToolbox/AudioFile.h>

#define NUM_BUFFERS 1

typedef struct
{
  AudioStreamBasicDescription dataFormat;
  AudioQueueRef               queue;
  AudioQueueBufferRef         buffers[NUM_BUFFERS];
  AudioFileID                 audioFile;
  SInt64                      currentPacket;
  bool                        recording;
}RecordState;

void AudioInputCallback(void * inUserData,  // Custom audio metadata
                        AudioQueueRef inAQ,
                        AudioQueueBufferRef inBuffer,
                        const AudioTimeStamp * inStartTime,
                        UInt32 inNumberPacketDescriptions,
                        const AudioStreamPacketDescription * inPacketDescs);

@interface AudioRecorder : NSObject {
  RecordState recordState;
}

- (void)setupAudioFormat:(AudioStreamBasicDescription*)format;
- (void)startRecording;
- (void)stopRecording;
- (void)feedSamplesToEngine:(UInt32)audioDataBytesCapacity audioData:(void *)audioData;

@end
#endif
Implementation
#import "AudioRecorder.h"

#define AUDIO_DATA_TYPE_FORMAT float

@implementation AudioRecorder

void *refToSelf;

void AudioInputCallback(void * inUserData,  // Custom audio metadata
                        AudioQueueRef inAQ,
                        AudioQueueBufferRef inBuffer,
                        const AudioTimeStamp * inStartTime,
                        UInt32 inNumberPacketDescriptions,
                        const AudioStreamPacketDescription * inPacketDescs) {

  RecordState * recordState = (RecordState*)inUserData;

  AudioQueueEnqueueBuffer(recordState->queue, inBuffer, 0, NULL);

  AudioRecorder *rec = (AudioRecorder *) refToSelf;

  [rec feedSamplesToEngine:inBuffer->mAudioDataBytesCapacity audioData:inBuffer->mAudioData];
}

- (id)init
{
  self = [super init];
  if (self) {
    en = new ASREngine();
    en->engineInit("1293.lm", "1293.dic");
    refToSelf = self;
  }
  return self;
}

- (void)setupAudioFormat:(AudioStreamBasicDescription*)format {
    format->mSampleRate = 16000.0;

    format->mFormatID = kAudioFormatLinearPCM;
    format->mFormatFlags = kAudioFormatFlagsNativeFloatPacked;
    format->mFramesPerPacket  = 1;
    format->mChannelsPerFrame = 1;
    format->mBytesPerFrame    = sizeof(Float32);
    format->mBytesPerPacket   = sizeof(Float32);
    format->mBitsPerChannel   = sizeof(Float32) * 8;
}

- (void)startRecording {
  [self setupAudioFormat:&recordState.dataFormat];

  recordState.currentPacket = 0;

  OSStatus status;
  status = AudioQueueNewInput(&recordState.dataFormat,
                              AudioInputCallback,
                              &recordState,
                              CFRunLoopGetCurrent(),
                              kCFRunLoopCommonModes,
                              0,
                              &recordState.queue);

  if (status == 0) {

    for (int i = 0; i < NUM_BUFFERS; i++) {
      AudioQueueAllocateBuffer(recordState.queue, 256, &recordState.buffers[i]);
      AudioQueueEnqueueBuffer(recordState.queue, recordState.buffers[i], 0, nil);
    }

    recordState.recording = true;

    status = AudioQueueStart(recordState.queue, NULL);
  }
}

- (void)stopRecording {
  recordState.recording = false;

  AudioQueueStop(recordState.queue, true);

  for (int i = 0; i < NUM_BUFFERS; i++) {
  AudioQueueFreeBuffer(recordState.queue, recordState.buffers[i]);
  }

  AudioQueueDispose(recordState.queue, true);
  AudioFileClose(recordState.audioFile);
}

- (void)feedSamplesToEngine:(UInt32)audioDataBytesCapacity audioData:(void *)audioData {
  int sampleCount = audioDataBytesCapacity / sizeof(AUDIO_DATA_TYPE_FORMAT);
  AUDIO_DATA_TYPE_FORMAT *samples = (AUDIO_DATA_TYPE_FORMAT*)audioData;

  //Do something with the samples
  for ( int i = 0; i < sampleCount; i++) {
    //Do something with samples[i]
  }
}

@end
« Previous: Thank God for Masonry - #IOSDev Next: Converting raw audio data captured from openframeworks to wav using SOX »
Converting raw audio data captured from openframeworks to wav using SOX
Mon Jul 7, 2014
sox -r 16000 -e floating-point -b 32 -c 1 input.raw output.wav
where
-r 16000          -> Sampling rate of 16000
-e floating-point -> Encoded with floating point numbers
-b 32             -> Bits/Sample 32
-c 1              -> No. of input channels 1
« Previous: Record Microphone Audio into a Float Buffer with AudioQueues - #IOSDEV Next: Uploading raw audio data from Openframeworks (C++) to web server (GO) - #IOSDEV »
Uploading raw audio data from Openframeworks (C++) to web server (GO) - #IOSDEV
Sun Jul 6, 2014
Working with audio recordings has several pain points associated with them, which I’ll talk about below. The problems get compounded when you’re working on devices with limited capacities like mobile phones.
Back to the problems:
One solution is to simply upload the raw audio data and let the server decide the correct treatment.
Openframeworks App Setup
With the following setup, we’re recording audio sampled @ 16000 for 3 seconds. The samples are accumulated in the buffer periodically. For details, checkout this book. (http://books.google.com.au/books?id=WRr2AAAAQBAJ)
void ofApp::setup() {
  sampleRate = 16000;
  duration = 3;
  recPos = 0;
  size = duration * sampleRate
  isRecording = false;
  buffer.resize(size, 0.0); //buffer is a vector<float>
  //Note: these are some low fidelity settings.
  //You'd want to sample at least @44100 with 2 output channels and 4 buffers
  ofSoundStreamSetup(1, 1, this, sampleRate, 512, 1);
}

void ofApp::audioIn(float * input, int bufferSize, int nChannels){
  if (!isRecording) {
      return;
  }

  for (int i=0; i<bufferSize; i++) {
    buffer[recPos] = input[i];
    recPos++;
    recPos %= size;
  }
}
Turning on/off the recording
void ofApp::startListening() {
  std::fill(buffer.begin(), buffer.end(), 0)
  isRecording = true
}

void ofApp::stopListening() {
  isRecording = false;

  //Copy the vector into a buffer
  int size = sizeof(float) * buffer.size();
  float *myBuffer = new float[size];
  memcpy(myBuffer, &buffer[0], size);
  uploadSound(myBuffer, size);
  delete [] myBuffer;
}
Uploading sound with ASIHTTPRequest
We’ll use POST request to send the raw data to the server.
void ofApp::uploadSound(float *input, int bufferSize) {
  NSData *data = [[NSMutableData alloc] initWithBytes:input length:bufferSize];

  ASIFormDataRequest *dataReq =
  [ASIFormDataRequest requestWithURL:
                      [NSURL URLWithString:@"http://192.168.0.7:3000/rawsound/sample"]];

  [dataReq setData:data
           withFileName:@"audio"
           andContentType:nil forKey:@"audio"];

  [dataReq setCompletionBlock:^{
    NSLog(@"Success.");
  }];

  [dataReq setFailedBlock:^{
    NSLog(@"POST Error: %@", dataReq.error);
  }];

  [dataReq startAsynchronous];
}
That’s for the client side. You’d still have to process the request in the sever.
Server Side - GO
func UploadRawSound(r *http.Request, params martini.Params) string {
  file, _, err := r.FormFile("audio")
  defer file.Close()
  if err != nil {
    return "500"
  }

  //Save a raw file
  out, err := os.Create("upload/sample.raw")
  defer out.Close()
  if err != nil {
    return "500"
  }
  _, err = io.Copy(out, file)
  if err != nil {
    return "500"
  }

  return "200"
}
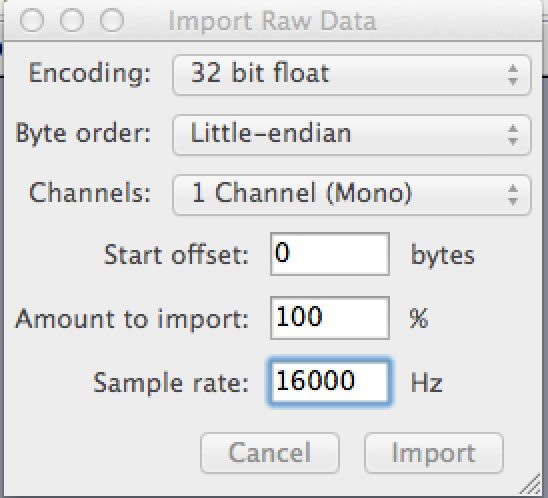
That’s it. Now you can import the sample.raw file in Audacity with the following settings:
32 Bit Float
Little Endian
Sample Rate: 16000
Channels: 1
Also depicted in the image below:
« Previous: Converting raw audio data captured from openframeworks to wav using SOX Next: Debugging EXC_BAD_ACCESS - #IOSDEV »
Debugging EXC_BAD_ACCESS - #IOSDEV
Fri Jul 4, 2014
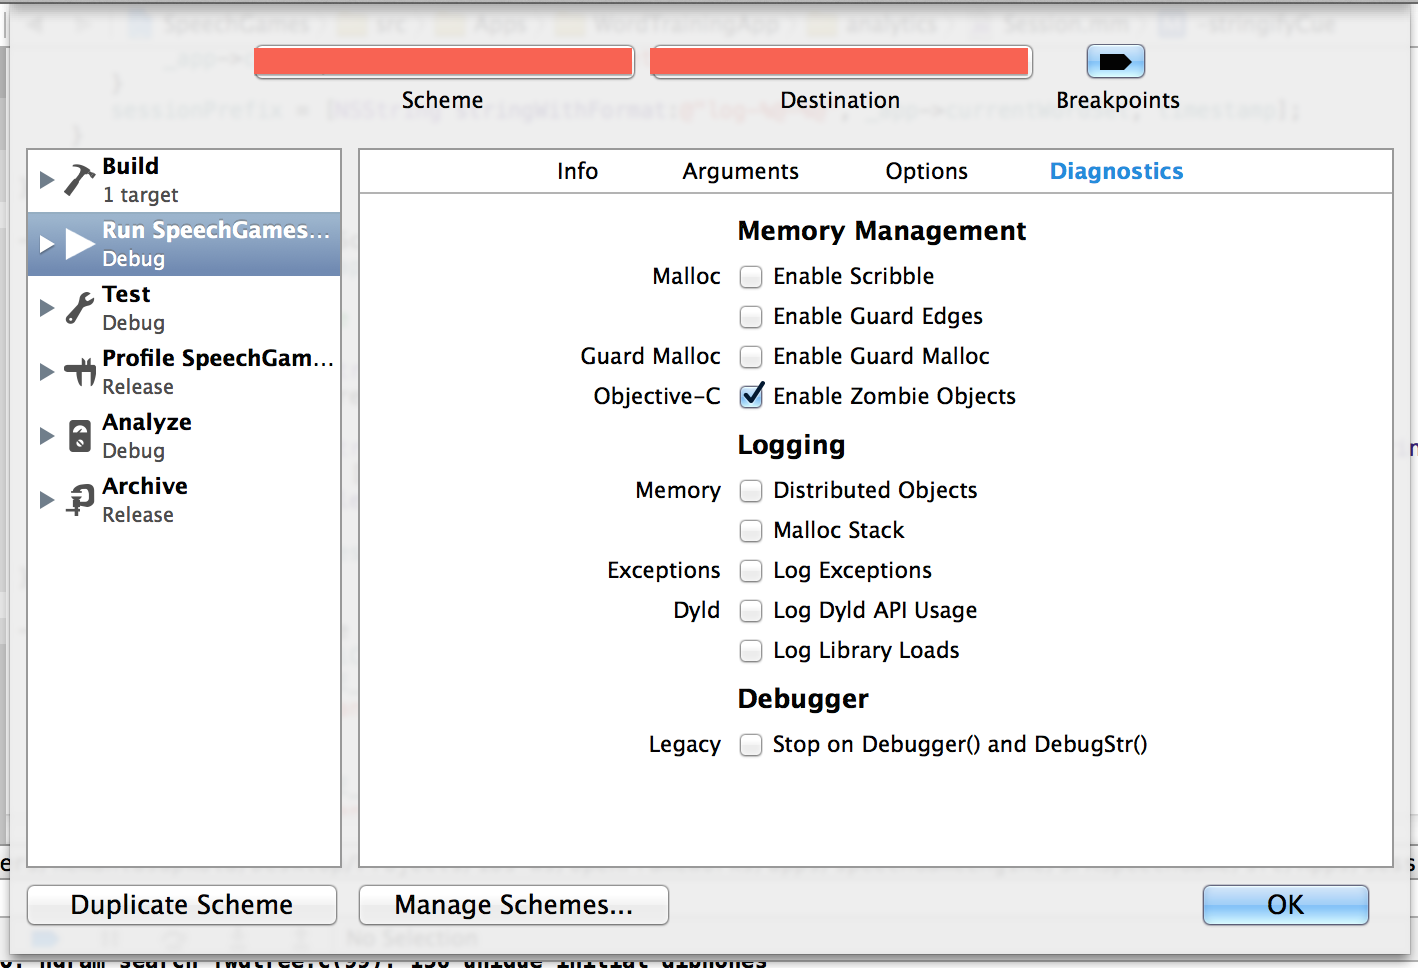
Debugging EXC_BAD_ACCESS bugs can be real pain, as you it can leave you scratching the head.EXC_BAD_ACCESS occurs when the code tries to reference objects that have been deallocated. They’re called Zombie objects.
To enable debugging, enable NSZombieObjects option from the Edit Scheme of the current target. See image below:
« Previous: Uploading raw audio data from Openframeworks (C++) to web server (GO) - #IOSDEV Next: Recording and Uploading HTML5 WebAudio - Angular + GO »
Recording and Uploading HTML5 WebAudio - Angular + GO
Mon Jun 30, 2014
Introduction
In this brief tutorial, I’ll show how to record audio with HTML5 Web Audio API and upload it to server.
Libraries
We’ll use the RecordRTC library for handling the nitty gritty of Web Audio API.
Client side Recording
The following angular service initialises recordRTC context and maps it to the window. It also exposes the UploadLastRecording method for posting
the audio data to the server.
angular.module('app.audioMaster', [])

.factory('AudioService', [
   '$window', '$http'
   ($window, $http) ->
     navigator.userMedia = (
       $window.navigator.getUserMedia ||
       $window.navigator.webkitGetUserMedia ||
       $window.navigator.mozGetUserMedia ||
       $window.navigator.msGetUserMedia)

     navigator.getUserMedia {audio:true, video:false},
       (stream) ->
         $window.recordRTC = RecordRTC(stream)
         return
       (err) ->
         console.log(err)
         return

     return {
       UploadLastRecording: ->
         blob = $window.recordRTC.getBlob()
         fd = new FormData()
         fd.append('audio', blob)
         $http.post('/path/to/server', fd,
           {
             transformRequest: angular.identity
             headers: {'Content-Type' : undefined }
           }).success(data) ->
           console.log("Posted sound")
         return
     }
 ])
See here for more detail on how to post multipart form data in angular.
blob = $window.recordRTC.getBlob() returns the binary data which is ready to be sent over the wire.
AudioService will have to be injected in a controller for proper use. Ex:
.controller('audioCtrl', [
  '$scope', '$window', 'AudioService'
  ($scope, $window, AudioService) ->

    $scope.onRecord = ->
      $window.recordRTC.startRecording()

    $scope.onStopRecord = ->
      $window.recordRTC.stopRecording (audioUrl) ->
        AudioService.UploadLastRecoding()
])
Server Side Processing with GO + Martini
Assuming we’re using the following API for posting to the server: “/sound/:key/”
func UploadSound(db *leveldb.DB, r *http.Request) string {
  file, _, err := r.FormFile("audio")
  defer file.Close()
  if err != nil {
    return "500"
  }

  filename := fmt.Sprintf("upload/%s.wav", params["key"])
  out, err := os.Create(filename)
  defer out.Close()
  if err != nil {
    return "500"
  }
  _, err = io.Copy(out, file)
  if err != nil {
    return "500"
  }
  return "200"
}
The above code reads the blob of audio data and stores it in a folder in the server.
« Previous: Debugging EXC_BAD_ACCESS - #IOSDEV Next: Using LevelDB & Go with Heroku without addons »
Using LevelDB & Go with Heroku without addons
Thu Jun 26, 2014
Heroku is great because it allows you to deploy LevelDB in your GO webapp as it is. Google App Engine, on the other hand does not. Instead, you’d have to use the DataStore API. Not exactly a portable solution, if you wish to migrate your codebase to some other provider in the future.
Here’s an examples source:
package main

import (
  "github.com/syndtr/goleveldb/leveldb"
)

func main() {
  db, err := leveldb.OpenFile("db", nil)
  if err != nil {
    return
  }
  defer db.Close()
}
To run it all you have to do it:
godep save
git push heroku master
The reason why this works is that the leveldb package is a pure GO implementation.
« Previous: Recording and Uploading HTML5 WebAudio - Angular + GO Next: Consuming Binary Data in Angular with ProtobufJS »
Consuming Binary Data in Angular with ProtobufJS
Tue Jun 10, 2014
For one of the apps that I’ve been working on, I have a server written in GO that sends out binary data encoded with Google Protobuf messages via. REST endpoints. For example:
message Word {
  optional string name = 1;
  optional string category = 2;
}

message WordList {
  repeated Word word = 1;
}
The question is how do you consume the binary data in Angular ? The answer - Use responseType: "arraybuffer" in your $http.get.
$http.get("/words", {responseType: "arraybuffer"}).success (data) ->
  ##Process data
The second question is how do you decode the binary data in Javascript/Angular ? The answer - Use ProtobfJS.
Installation is easy with bower:
bower install --save protobuf
Once installed, don’t forget to add libs in your index.html.
<script src="bower_components/bytebuffer/ByteBuffer.min.js"></script>
<script src="bower_components/ProtoBuf/ProtoBuf.min.js"></script>
Finally, decoding the data.
WordList = dcodeIO.ProtoBuf.loadProtoFile("/model").build("model.WordList")
$http.get("/words", {responseType: "arraybuffer"}).success (data) ->
  wlist = WordList.decode(data)
  $scope.words = wlist.word
« Previous: Using LevelDB & Go with Heroku without addons Next: Selecting a GO web framework - Martini »
Selecting a GO web framework - Martini
Fri Jun 6, 2014
When GO came out in 2009, I had looked into it briefly. At the time, I didn’t have much experience writing web servers or concurrent systems, therefore, couldn’t fully put into perspective the different features Go had introduced.
Fast forward around April 2014, after having extensive experience working on Javascript and Node.JS, I picked up GO again. I even attended GoLang Sydney Meetup at ThoughtWorks.
Go is likely to be a number one choice for writing servers in the coming years.
Martini by CodeGangsta
Martini is a framework for writing web applications in GO, which is extremely easy to pick up. Conceptually, It’s similar to Express-JS, which the main reason why I went with it.
Sample Code - Martini + LevelDB
package main

import (
  "sample/handler"
  "github.com/go-martini/martini"
  "github.com/syndtr/goleveldb/leveldb"
)

func main() {
  db, err := leveldb.OpenFile("db", nil)
  if err != nil {
    return
  }
  defer db.Close()

  m := martini.Classic()
  m.Map(db)

  m.Get("/model", handler.GetProtoSchema)
  m.Get("/words", handler.GetWords)
  m.Post("/word", handler.PostWord)
  m.Post("/tag", handler.TagWord)
  m.Delete("/word/:name", handler.DeleteWord)
  m.Post("/upload", handler.UploadPic)

  m.Run()
}
« Previous: Consuming Binary Data in Angular with ProtobufJS Next: Compiling protobuf with openFrameworks. »
Compiling protobuf with openFrameworks.
Thu May 22, 2014
For the past two days, I’ve been trying to get Google Protobuf to work with openFrameworks (c++) in XCode 5.1.1, without success.
Actually, getting protobuf to work in standard IOS projects is trivial, thanks to
CocoaPods. A Podfile with the following entry
pod 'GoogleProtobuf', '~> 2.5.0' combined with pod install
does the job very well. Also, see this.
However, openFrameworks has its own build settings that does not play well with CocoaPods workspace. Thankfully, protobuf-objc is here to save the day.
protobuf-objc is an implementation of Protocol
Buffers in Objective-C. Installation procedure is straight forward. The only
thing to remember is that compiling .proto files should done via. the
protoc-gen-objc plugin. More specifically,
protoc --plugin=/usr/local/bin/protoc-gen-objc person.proto --objc_out="./"
The resulting files are pb.h & pb.mm.
Switching to a Mechanical Keyboard
Sat May 17, 2014
Writing codes on the in-built keyboard for Macbook Pro, it turns out, is not a good idea for your fingers, especially if you write code all day. Switching to a mechanical keyboard was the right thing to do.
So What are mechanical keyboards ? I’ll quote from the Tactile Keyboards Group founded by the legendary Eric Raymond.
What makes them better than a modern soft-touch keyboard? The fundamental reason is ergonomic. Mechanical keyboards (and especially buckling-spring keyboards) provide clear tactile feedback that a keypress has taken place a handful of milliseconds before the key would actually bottom out. This feedback makes it possible for the typist to stop pushing before the key bottoms out, reducing total effort by up to a (measured) factor of two.
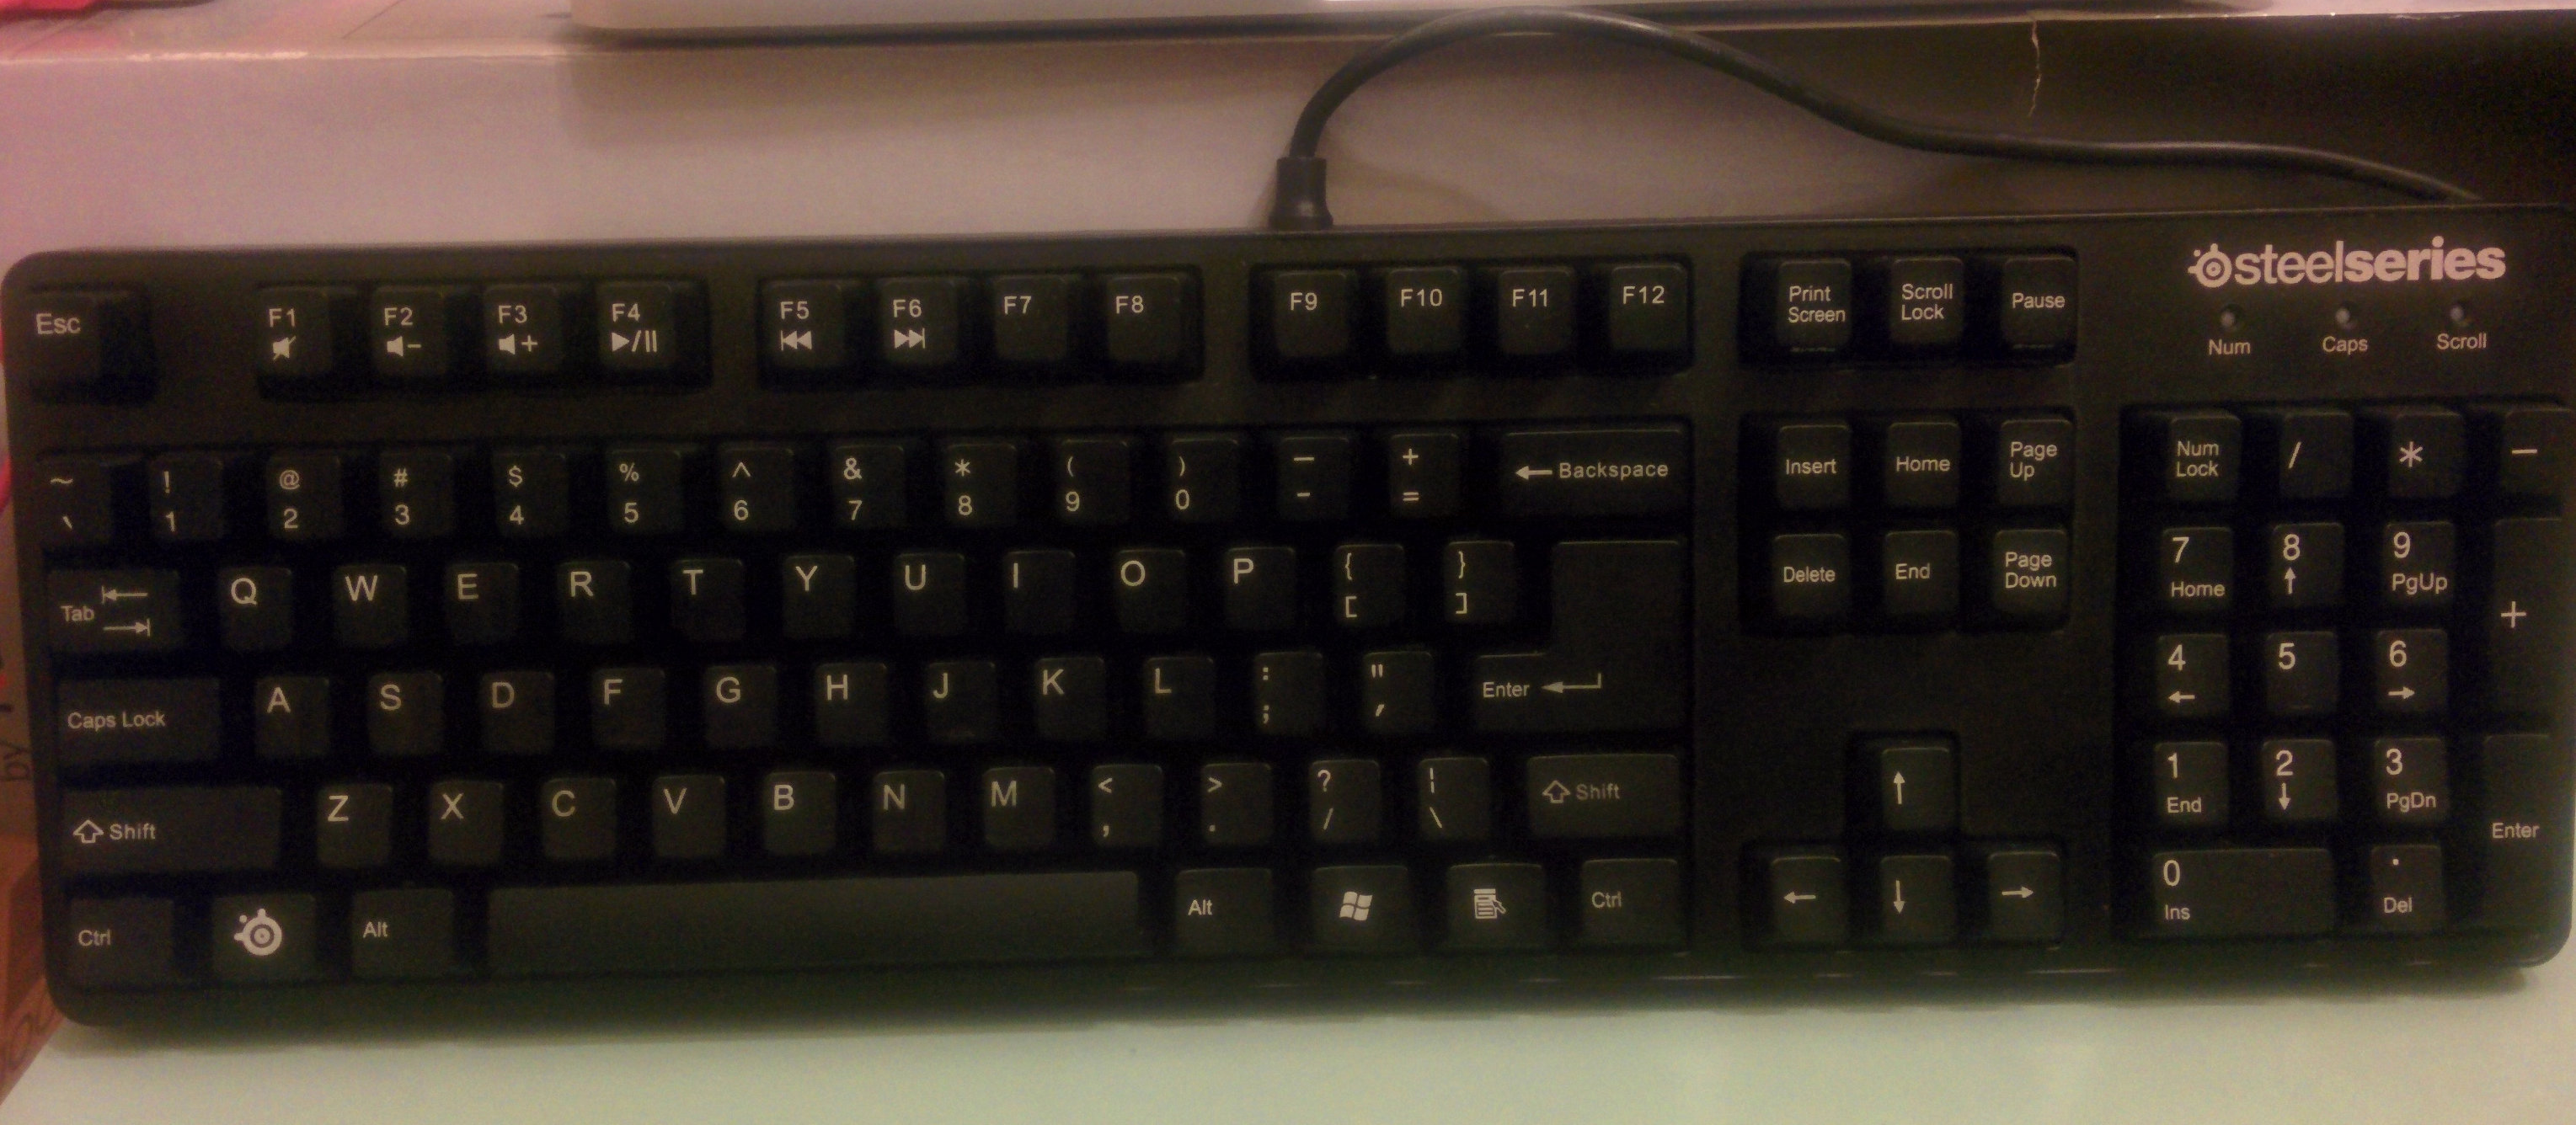
I wanted to get the CODE 87-Key Mechanical Keyboard - Cherry MX Green 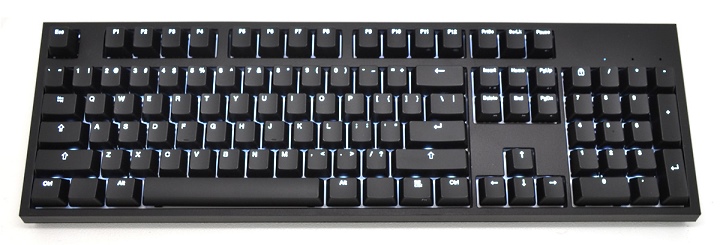 but the shipping to Australia is too damm expensive. $165 + $60 shipping.
Instead, I got the Steel Series gaming mechanical keyboard from Jb-Hifi, priced at $125.
So What’s the verdict ?
Mechanical keyboard are absolutely great. I just feel dumb not knowing about them earlier. I’m now typing longer, faster and better.
Getting used to it took about a week, and to make the process fun I used this Typing.io.
For more information about mechanical keyboards, see:
Should I be a Freelancer ?
Mon May 12, 2014
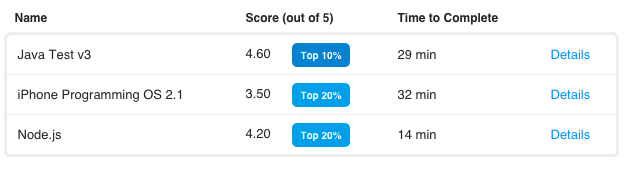
The other day I took a few skills tests for Java, Node.JS and IOS Development on ODesk, and was surprisingly happy with the results. Although, I admit I could’ve done better with IOS, due to the fact I took all the tests on the same day.
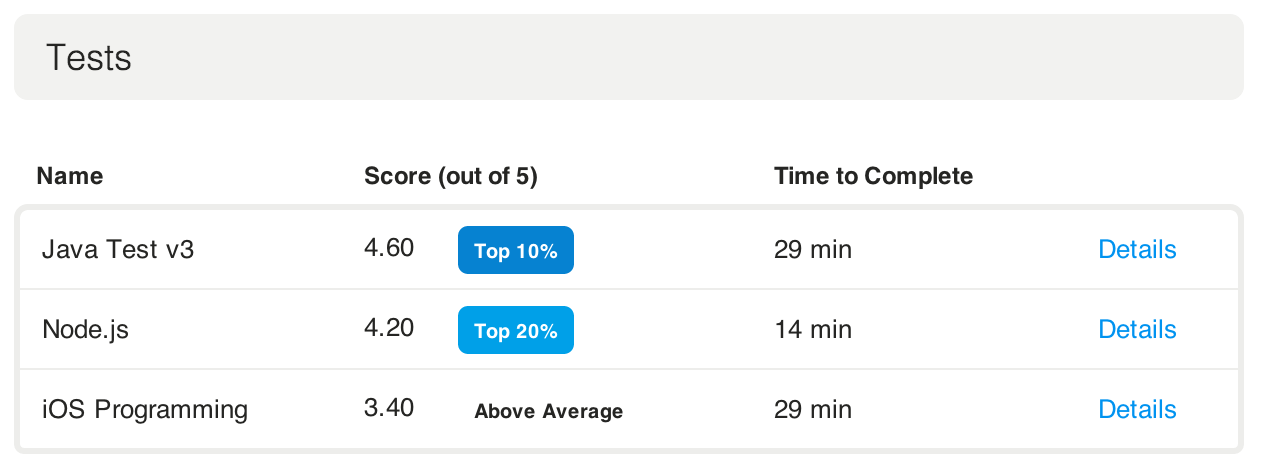
You can take retests on Odesk after a month of taking the original one. So I defintely inted to take the IOS test again.
It’s been a while since I have worked on real IOS project that utlises the core IOS SDK. The last work that I did was whilst I was working for Adtec, where I worked on the Qocca app.
I’m looking forward to getting up to the speed with IOS 7 SDK updates. Looks like http://ios7.codeschool.com/ is perfect for this.
In the meantime, I’ll work on setting up a good profile for ODesk and hopefully land some good jobs.
Update - 13 Oct 2014 I took a newer and mored advanced IOS test. Definitely better than the last time.
Getting Started With Grunt - Book Review
Thu Apr 24, 2014

The book maybe about Grunt, but its biggest value proposition, IMHO, is the excellent walkthrough on the Node.js ecosystem and modern web development.
The author has very cleverly leveraged Grunt as a medium to introduce more advanced tools like Coffeescript, Jade, Stylus, all of which when used properly results in a huge productivity boost. See Chapter 4 Grunt in Action.
The only thing that I felt missing was a chapter on Javascript itself. A brief intro on Javascript and its idiosyncrasies could have served as a nice appendix. Although, the book does contain a good reference list on Javascript.
Who will benefit from the book ? Not including the usual front-end developers and framework creators:
Experienced Java developers like myself who’ve made the move to the dynamic world of Javascript (front-end/backend)
Web developers proficient in JQuery/PHP but have failed to get onboard the Node train
All in all, there’s no doubt that the book will serve as a handy reference for Javascript developers
Find this book on Amazon.
J2ObjC Eclipse Plugin
Mon Apr 21, 2014
News
Source Code
The complete source code to the plugin is at https://github.com/hemantasapkota/j2objc-eclipse-plugin
Installation - Plugin
In Eclipse, Install a new software via the following update site:
Eclipse Juno/Kepler (4.2 / 4.3)
https://raw.github.com/hemantasapkota/j2objc-eclipse-plugin/master/update_site
Eclipse Indigo 3.7
https://raw.github.com/hemantasapkota/j2objc-eclipse-plugin/3.7/update_site
Installation - J2OBJC Compiler
To be able to use the plugin, you should have the J2ObjC compiler in your system. Download it from http://code.google.com/p/j2objc/downloads/list and unzip it in your system.
Usage - Set the Path to the Compiler
Once installed, you should set the path to J2ObjC compiler in Eclipse global preferences.

Tutorial - Generate Objective-C from Java
Create a new java project called java2ios. In it, create a new class called BilingualHello.java with the package name java.ios. The contents of the file are as follows:
package java.ios;

public class BilingualHello {

    String helloInEnglish;
    String helloInSpanish;

    public BilingualHello() {
        helloInEnglish = "hello";
        helloInSpanish = "hola!";
    }

    public void sayHelloInEnglish() {
        System.out.println(helloInEnglish);
    }

    public void sayHelloInSpanish() {
        System.out.println(helloInSpanish);
    }

}
We will now use J2ObjC Eclipse Plugin to translate this source to Objective-C class. Right click on the project and click on the menu J2ObjC -> ToObjectiveC.
* *
*
You should see the command line feedback in the console. You can copy the command generated by the plugin and paste it in your terminal as well.

Once the translation is finished, you can see the generated files in your project.

The contents of the generated Objective-C class is below.
BilingualHello.h
//
//  Generated by the J2ObjC translator.  DO NOT EDIT!
//  source: /Volumes/MyFiles/Projects/WS/jptws/java2ios/src/java/ios/BilingualHello.java
//
//  Created by hemantasapkota on 12/31/12.
//

#import "JreEmulation.h"

@interface JavaIosBilingualHello : NSObject {
 @public
  NSString *helloInEnglish_;
  NSString *helloInSpanish_;
}

@property (nonatomic, copy) NSString *helloInEnglish;
@property (nonatomic, copy) NSString *helloInSpanish;

- (id)init;
- (void)sayHelloInEnglish;
- (void)sayHelloInSpanish;
@end
BilingualHello.m
//
//  Generated by the J2ObjC translator.  DO NOT EDIT!
//  source: /Volumes/MyFiles/Projects/WS/jptws/java2ios/src/java/ios/BilingualHello.java
//
//  Created by hemantasapkota on 12/31/12.
//

#line 1 "/Volumes/MyFiles/Projects/WS/jptws/java2ios/src/java/ios/BilingualHello.java"

#import "java/ios/BilingualHello.h"

#line 3
@implementation JavaIosBilingualHello

- (NSString *)helloInEnglish {
  return helloInEnglish_;
}

- (void)setHelloInEnglish:(NSString *)newHelloInEnglish {
  helloInEnglish_ = newHelloInEnglish;
}

- (NSString *)helloInSpanish {
  return helloInSpanish_;
}

- (void)setHelloInSpanish:(NSString *)newHelloInSpanish {
  helloInSpanish_ = newHelloInSpanish;
}


#line 8
- (id)init {
  if ((self = [super init])) {
    helloInEnglish_ = @"hello";
    helloInSpanish_ = @"hola!";
  }
  return self;
}

#line 13
- (void)sayHelloInEnglish {
#line 14
  NSLog(@"%@", helloInEnglish_);
}

#line 17
- (void)sayHelloInSpanish {
#line 18
  NSLog(@"%@", helloInSpanish_);
}

@end
Preferences
You can set the preferences for each java project by right clicking on it and selecting the properties menu.

« Previous: Getting Started With Grunt - Book Review Next: Tutorial - Creating Gmail/Facebook like Menu Navigation in IOS »
Tutorial - Creating Gmail/Facebook like Menu Navigation in IOS
Sun Jan 27, 2013
The following video shows the output of this tutorial.
Create a new Single View Application with Storyboards and Automatic Reference Counting. I’ve named the project TablessNavigationTemplate.
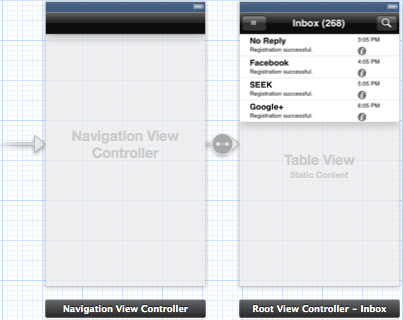
Designing the UI - Setting up Root View Controller
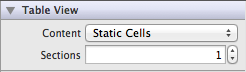
Drag and Drop a Navigation Controller onto the storyboard. When the navigation controller is dropped, Xcode automatically adds a UITableViewController as a Root View Controller. We’re going to use this root view controller as it is and add a couple of static cells onto it.
Select the root view controller and change the content type of the table to Static Cells.
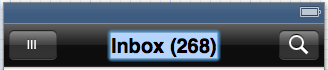
Double click navigation bar and change the text to Inbox (268). Drag and drop two bar button items on to the navigation bar. One button on the left. One button on the right. Set ||| as the text for the left button. For the button on the right, change its identifier to Search, from the inspector. The navigation bar should look something like this.
Now we’re going to create a couple of static cells. You can use your imagination here by dropping labels and button on it. The content of it is not very important. The static cells i designed look like this:
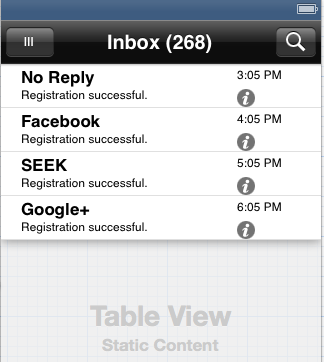
The navigation and root view controller should look like this:
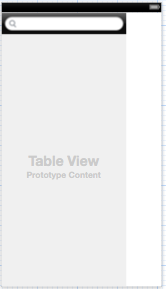
UI Design - Setting up App Navigation View
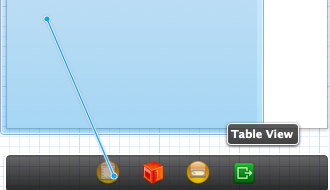
Next, we drag another View Controller. This view controller will be toggled on/off. The toggling is controlled by the ||| button on the navigation bar. Drag a Search Bar and a Table View onto this view controller. From the Size inspector on the right, limit the width of both the search bar and the table view to 250px. The following image should clarify this.
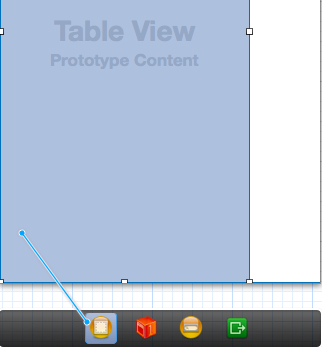
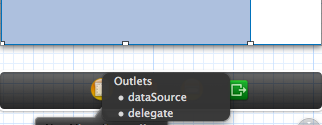
Now assign the data source and delegate for the table view by right clicking on it and dragging the line at the bottom. The following image should clarify this.
At this point, we create an Objective-C class corresponding to this view controller. We’ll call this CNavViewController. In the Identity Inspector, we change the class type of the view controller to CNavViewController. We also set the Storyboard Id to “navigationView”.
*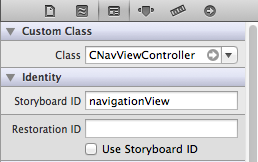 *
*
The interface definition (CNavViewController.h) looks like this:
#import <UIKit/UIKit.h>

@interface CNavViewController : UIViewController<UITableViewDataSource, UITableViewDelegate>

@property NSArray *navItems;            //contains the list of items to display in the table
@property IBOutlet UITableView *navTableView; //the outlet for our table in the view controller.

@end
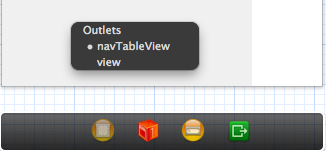
Notice the IBOutlet navTableView. We need to link up this outlet in the view controller. At the bottom of our CNavViewController in Storyboard, you should see a panel of icons. From the first icon, right click and drag a line onto the view controller. Xcode lists up the outlet that we just created i.e. navTableView. We select the navTableView outlet. The following images should clarify this.
In Summary, what we did was, to create a Navigation View Controller with a Table View Controller as its root view. We also created a custom View Controller that has a Search Bar and a UITableView. The final UI structure looks like this.
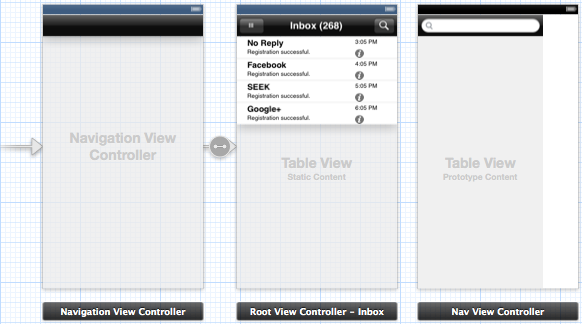
Before we go ahead in the next section to wire up the logic, for preparation, we need to give class names to each of the ui controllers above. We’ve already done this for our custom view controller i.e. CNavViewController. Set the class names CNavigationViewController and CRootViewController respectively in the identity inspector、referencing the image above.
Wiring the Classes and Logic - CNavViewController
Let’s continue implementing CNavViewController.
- (void)viewDidLoad
{
[super viewDidLoad];
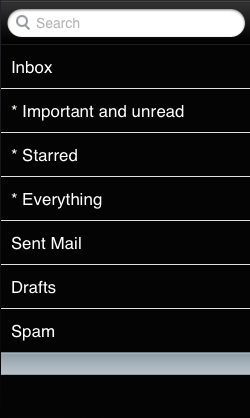
navItems = [NSArray arrayWithObjects:@"Inbox", @"* Important and unread", @"* Starred", @"* Everything", @"Sent Mail", @"Drafts", @"Spam" ,nil];
}
- (NSString *)tableView:(UITableView *)tableView titleForHeaderInSection:(NSInteger)section {
return @"";
}
- (NSString *)tableView:(UITableView *)tableView titleForFooterInSection:(NSInteger)section {
return @" ";
}
- (NSInteger)numberOfSectionsInTableView:(UITableView *)tableView
{
return 1;
}
- (NSInteger)tableView:(UITableView *)tableView numberOfRowsInSection:(NSInteger)section
{
return navItems.count;
}
- (UITableViewCell *)tableView:(UITableView *)tableView cellForRowAtIndexPath:(NSIndexPath *)indexPath
{
static NSString *CellIdentifier = @"Cell";
UITableViewCell *cell = [tableView dequeueReusableCellWithIdentifier:CellIdentifier];
if (cell == nil) {
cell = [[UITableViewCell alloc] initWithStyle:UITableViewCellStyleDefault reuseIdentifier:CellIdentifier];
}
// Configure the cell...
cell.textLabel.font = [UIFont fontWithName:@"Sans Serif" size:12];
cell.textLabel.textColor = [UIColor whiteColor];
cell.textLabel.backgroundColor = [UIColor clearColor];
cell.textLabel.text = [navItems objectAtIndex:indexPath.row];
return cell;
}
The above piece of code is responsible for loading data in the table view. The data is stored in NSArray in the class. The following would be the output for the code.
Wiring the Classes and Logic - CNavigationViewController
Create a class called CNavigationViewController which extends from UINavigationController. The purpose of this class is to manage the orientation for the app. To make matters simple for this tutorial, the app only supports Portrait orientation. We need to set that explicitly in the code.
- (BOOL)shouldAutorotate {
    return NO;
}

- (NSUInteger)supportedInterfaceOrientations {
    return UIInterfaceOrientationPortrait;
}
Wiring the Classes and Logic - CRootViewController
Create a class called CRootViewController which extends from UITableViewController. The CRootViewController is the meat of the app. It contains the logic to animate the navigation controller and vice versa. So I’ll go through it in detail. The interface definition file (CRootViewController.h) looks like this:
#import <UIKit/UIKit.h>;

@interface CRootViewController : UITableViewController

@property (strong) UIViewController *viewC;
 (IBAction)showNavigation:(id)sender;

@end
The implementation (CRootViewController.m) looks like this:
#import "CRootViewController.h"

@interface CRootViewController ()

@end

@class CNavViewController;

@implementation CRootViewController

@synthesize viewC;

    enum TranslateDirection {
        LEFT, RIGHT
    };

    const float TRANSLATE_CONST = 250;
    float translateX = TRANSLATE_CONST;
    enum TranslateDirection td = RIGHT;

- (IBAction)showNavigation:(id)sender {

    [UIView animateWithDuration:0.5f

            delay:0.0

            options:UIViewAnimationCurveLinear

            animations:^{
                if (td == LEFT) {
                    translateX = 0;
                } else if (td == RIGHT) {
                    translateX = TRANSLATE_CONST;
                }

                CGAffineTransform trans = CGAffineTransformMakeTranslation(translateX, 0);

                self.navigationController.view.transform = trans;

            }

            completion:^(BOOL finished){

                if (td == LEFT) {
                    td = RIGHT;
                } else if (td == RIGHT) {
                    td = LEFT;
                }

            }
     ];
}


- (void)viewDidLoad
{
    [super viewDidLoad];
    // Do any additional setup after loading the view, typically from a nib.

    viewC = [self.storyboard instantiateViewControllerWithIdentifier:@"navigationView"];
    [self.navigationController.view.window insertSubview:viewC.view atIndex:0];

}

- (void)didReceiveMemoryWarning
{
    [super didReceiveMemoryWarning];
    // Dispose of any resources that can be recreated.
}
@end
In the showNavigation method, we’re using IOS Blocks to slide our navigation controller to the right. For this we construct an affine transformation that transforms the navigation controller by 250px to the right. We do a little plumbing to toggle the direction of translation i.e. right to left or left to right.
In the viewDidLoad method, we instantiate a view controller that has the storyboard id “navigationView”. *This is the CNavViewController* view. And the most important thing is, we place this view controller at index 0 inside the app window. This means, this view resides just below the navigation controller which in turn means, when the navigation controller is translated to the right, the CNavViewController residing at the bottom shows up.
In the final step, we link up the showNavigation outlet method to the ||| button on the top left corner of the navigation bar. To do this, right click on the button and drag it below to the first icon on the panel and select the outlet: showNavigation.
That’s it for the tutorial. Thank you for your time.
Source Code
The full source code to this tutorial is at https://github.com/hemantasapkota/TablessNavigationTemplate
Tutorial - Embed Lua in Java w/LibGDX and Box2D
Tue Jan 15, 2013
Video Demonstration
Before moving forward, Let’s have a look at what we’re creating. It’s a LibGDX Box2D project that has one physics object. Using an external Lua script we control the physics object. More specifically, we use the cursor keys to control the camera and the “A” key to set the speed of the revolute joint.
Downloading the Libraries
LibGDX - https://code.google.com/p/libgdx/downloads/list LuaJ - http://sourceforge.net/projects/luaj/files/latest/download
Setting up the Project
Create a new project in Eclipse called Embed-Lua-Java-Box2D. Alternatively, you can just fork the source from github. Add the following libraries to the project:
Structure
We’re creating a LibGDX project. I’m being cautious as to not refer this a game, as it is not. In LibGDX project, we’ll create a Box2D world and put some physics objects. We’ll use an external Lua script that’ll control some aspects of the physics object.
Setting up Box2D
Have a look at MyGdxGame.java. I’ll highlight some important portion of the code.
@Override
public void create() {
    Vector2 gravity = new Vector2(0, -9);
    world = new World(gravity, true);
    debugDraw = new Box2DDebugRenderer();

    float w = Gdx.graphics.getWidth();
    float h = Gdx.graphics.getHeight();

    cam = new OrthographicCamera(w / 10, h / 10);
    cam.position.set(cam.viewportWidth / 2, cam.viewportHeight / 2, 0);

    scriptManager = new LuaScriptManager(
            world,
            cam,
            "scripts/tumbler.lua");

    createBodies();

    scriptManager.executeInit();
}

private void createBodies() {
  {
      BodyDef bodyDef = new BodyDef();
      ground = world.createBody(bodyDef);
  }

  {
      BodyDef bodyDef = new BodyDef();
      bodyDef.type = BodyType.DynamicBody;
      bodyDef.allowSleep = true;
      bodyDef.position.set(0.0f, 0.0f);
      body = world.createBody(bodyDef);

      PolygonShape shape = new PolygonShape();

      shape.setAsBox(0.5f, 10.0f, new Vector2(5.0f, 0.0f), 0.0f);
      body.createFixture(shape, 5.0f);

      shape.setAsBox(0.5f, 10.0f, new Vector2(-5.0f, 0.0f), 0.0f);
      body.createFixture(shape, 5.0f);

      shape.setAsBox(10.0f, 0.5f, new Vector2(0.0f, 5.0f), 0.0f);
      body.createFixture(shape, 5.0f);

      shape.setAsBox(10.0f, 0.5f, new Vector2(0.0f, -5.0f), 0.0f);
      body.createFixture(shape, 5.0f);

      RevoluteJointDef rjd = new RevoluteJointDef();
      rjd.bodyA = ground;
      rjd.bodyB = body;
      rjd.localAnchorA.set(0.0f, 10.0f);
      rjd.localAnchorB.set(0.0f, 0.0f);
      rjd.referenceAngle = 0.0f;
      rjd.motorSpeed = 0.05f * MathUtils.PI;
      rjd.maxMotorTorque = 1e8f;
      rjd.enableMotor = true;
      joint = world.createJoint(rjd);

  }
}

@Override
public void render() {
    Gdx.gl.glClear(GL10.GL_COLOR_BUFFER_BIT);

    cam.update();
    cam.apply(Gdx.graphics.getGL10());

    debugDraw.render(world, cam.combined);
    world.step(1 / 60f, 100, 100);

    if (Gdx.input.isKeyPressed(Keys.RIGHT)) {
        scriptManager.executeKeyPressed("Right", body, joint);
    } else if (Gdx.input.isKeyPressed(Keys.LEFT)) {
        scriptManager.executeKeyPressed("Left", body, joint);
    } else if (Gdx.input.isKeyPressed(Keys.A)) {
        scriptManager.executeKeyPressed("A", body, joint);
    }
}
Now, just to grab your attention on the subject matter, the following image shows the rendering of the above code.
Setting up Lua script manager
Firstly, we define the notion of our script. For the purposes of this tutorial, I’ll define our script as block of code that has two functions in Lua:
It is important to note that the signature of these functions are entirely up to you to define depending on your requirements. Later, we’ll create an external script file with these functions. Now Let’s move on to conceptualizing this notion of script in our project by creating an java interface called IScript.
/**
 * The Interface IScript.
 */
public interface IScript {

      /**
     * Can execute.
     *
     * @return true, if successful
     */
    boolean canExecute();

      /**
     * Execute init. This method is called only once per each script.
     */
    void executeInit();

      /**
     * Execute key pressed.
     *
     * @param key the key
     * @param body the body
     * @param joint the joint
     */
    void executeKeyPressed(String key, Body body, Joint joint);
}
We’ll implement this interface in LuaScriptManager - the handler that is responsible for calling lua functions in our project. The implementation of LuaScriptManager looks like this:
public class LuaScriptManager implements IScript {

    /** The globals. */
    private Globals globals = JsePlatform.standardGlobals();

    /** The chunk. */
    private LuaValue chunk;

    /** The script file exists. */
    private boolean scriptFileExists;

    /** The world. */
    private World world;

    /** The cam. */
    private Camera cam;

    /**
     * Instantiates a new lua script manager.
     *
     * @param world the world
     * @param cam the cam
     * @param scriptFileName the script file name
     */
    public LuaScriptManager(World world, Camera cam, String scriptFileName) {
        this.world = world;
        this.cam = cam;

        if (!Gdx.files.internal(scriptFileName).exists()) {
            scriptFileExists = false;
            return;
        } else {
            scriptFileExists = true;
        }

        chunk = globals.loadFile(scriptFileName);

        // very important step. subsequent calls to script method do not work if the
        // chunk
        // is not called here
        chunk.call();

    }

    /* (non-Javadoc)
     * @see com.laex.IScript#canExecute()
     */
    @Override
    public boolean canExecute() {
        return scriptFileExists;
    }

    /* (non-Javadoc)
     * @see com.laex.IScript#executeInit()
     */
    @Override
    public void executeInit() {
        if (!canExecute()) {
            return;
        }

        //there must be a corresponding init method in the external lua script file
        globals.get("init").invoke(
                new LuaValue[] { CoerceJavaToLua.coerce(world),
                        CoerceJavaToLua.coerce(cam) });
    }

    /* (non-Javadoc)
     * @see com.laex.IScript#executeKeyPressed(java.lang.String, com.badlogic.gdx.physics.box2d.Body, com.badlogic.gdx.physics.box2d.Joint)
     */
    @Override
    public void executeKeyPressed(String key, Body body, Joint joint) {
        if (!canExecute()) {
            return;
        }

        //there must be a corresponding keyPressed method in the external lua file
        globals.get("keyPressed").invoke(
                new LuaValue[] { CoerceJavaToLua.coerce(world),
                        CoerceJavaToLua.coerce(cam),
                        CoerceJavaToLua.coerce(body),
                        CoerceJavaToLua.coerce(joint), LuaValue.valueOf(key) });
    }
}
There are some key things to note while calling Lua functions from Java:
Lua Script
The contents of our Lua Script file looks like this:
function init(world, cam)//not doing anything here for now. Possible usage could be setting some configuration for world and camera
end

function keyPressed(world, cam, body, joint, key)    //translate the camera to right
    if key == "Right" then
        cam:translate(0.5, 0, 0)
    end
    //translate the camera to left
    if key == "Left" then
        cam:translate(-0.5, 0, 0)
    end
    //set motor speed to 1.
    if key == "A" then
        joint:setMotorSpeed(1)
    end
end
Remember, we’re calling the init() and keyPressed() method from LuaScriptManager class.
Conclusion
If you have any thoughts, you can put them on the comments below. Dont forget to check out the source at: https://github.com/hemantasapkota/Embed-Lua-Java-Box2D
« Previous: Tutorial - Creating Gmail/Facebook like Menu Navigation in IOS Next: Tutorial - Simple Personal Information Manager (PIM) for iPhone »
Tutorial - Simple Personal Information Manager (PIM) for iPhone
Thu Dec 13, 2012
Simple Personal Information Manager (PIM) is a basic app for iphone/ipod touch for managing personal information like email a/c, registration numbers, bank a/c. This is a one-stop app for conveniently looking up personal info when needed. Before we begin the tutorial, let’s check out the output of this tutorial. The video shows what we intend to create during this tutorial.
Creating the project
I’ll be using Xcode 4.3.2 and testing the app in iPhone 3GS. Without further delays, create a new XCode Project and select Single View application for the iPhone platform. Select Automatic Reference Counting and Use Storyboards.

Setting up Navigation Controller and Root View Controller
At this point, if you click on MainStoryboard.storyboard you should see a single view. Remove this view and drag a Navigation Controller from the right, as shown in the image below.

In the image above we have a Navigation controller linked up to a Root View Controller titled Simple PIM. You can change the title of the root view controller from the attributes inspector on the right. As of now, our root view controller is actually a Table View Controller. We will remove this and add a simple View Controller as a root view controller. So remove the Table View Controller by deleting it and drag a View Controller from the right. Once you have dragged it, you need to set this new view controller as the root view. So right click on the Navigation Controller and drag the click on to the view controller, as shown in the image below. Select Relationship - Root View Controller. This action sets up the newly created view controller as the root view of the navigation controller.


Now click on the top navigation bar of the view controller and change the title to Simple PIM.
UI Design
For the purpose of this tutorial, our root view will have only two buttons called Bank A/C and Gmail ID. In order to make the buttons look pretty, i have provided two gradient images for button. You can use them as background image to the buttons. Download and drag them to your project in XCode. For more information on how you can create such images, see https://github.com/dermdaly/ButtonMaker


Drag two Round Rect Button and align them at the center. Change the type of the buttons to Custom; set the background image to blue and green respectively. Change the Text Color to White and name the buttons: Bank A/C and Gmail ID. This is illustrated below.

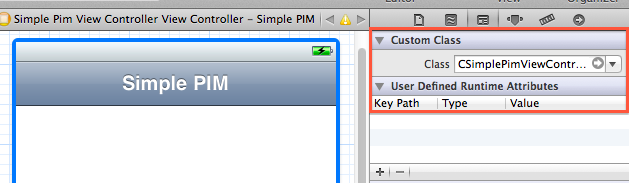
One final thing to do here, is to map this view controller to a UIViewController class. Create a new class that extends from UIViewController and name it SimplePimViewController. In the storyboard, select the above view controller and in the custom class section of identity inspector on the right, give the name CSimpleViewController. This is illustrated below:
Wiring the code for the Buttons
The idea is this: When we click a button, a table view should show up listing all the information. We will save all the information in a PLIST files. The files will reside inside the application. This approach is not safe for storing sensitive information but for the purpose of this tutorial, it should be okay. So when a button is clicked, the table view controller will load the corresponding PLIST file.
Create two PLIST files named: netbank.plist and gmail.plist with the following contents:
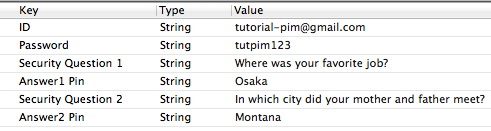
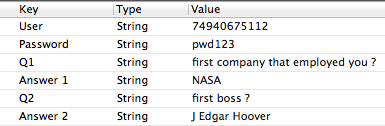
Now let’s create a table view controller by dragging it from the right. After that, create a new Objective-C class called PListTableViewController and make sure it’s base class is UITableViewController. We will map the newly dragged table view controller to this class. Similar to what we’ve done above, in the** custom class** section of identity inspector on the right, put the name CPListTableViewController. The following is the description of what the two classes are supposed to do.
CSimplePimViewControllerHandles the button touched eventsCPListTableViewControllerLoads the data from the PLIST files and displays in table view In CSimplePimViewController we create the two methods as shown below.
#import <UIKit/UIKit.h>

@interface CSimplePimViewControllerViewController : UIViewController

-(IBAction)onBankAcClicked:(id)sender;
-(IBAction)onGmailIdClicked:(id)sender;

@end

The initial implementation method looks something like this:


- (IBAction)onBankAcClicked:(id)sender {
    CPListTableViewController *cPimController = [CPListTableViewController new];
    [cPimController setTitle:@"Bank A/C"];
    [self.navigationController pushViewController:cPimController animated:true];
}

- (IBAction)onGmailIdClicked:(id)sender {
    CPListTableViewController *cPimController = [CPListTableViewController new];
    [cPimController setTitle:@"Gmail ID"];
    [self.navigationController pushViewController:cPimController animated:true];
}
The code just instantiates a new object of CPListTableViewController and pushes it to the navigation controller.
One last important thing remaining now is to map the buttons to the IBAction in the code. Right click on each button, drag it and map it to the corresponding IBActon as illustrated below. Do the same for each of the buttons.


Testing what we have so far
If you’ve followed all the steps so far, the output you have should resemble what i have in the following video.
Logic Time - Writing the code for CPListTableViewController
By now, we have the structure and wiring for our application. All we need is the code that loads up the PLIST file and displays it. Firstly, the interface file looks like this:
  @interface CPListTableViewController : UITableViewController

  //we init this class via this method. In the input, we provide the PLIST filename without
  //the extension
  - (id) initWithDataFile:(NSString*)dataFile;

  @end

  NSDictionary *contentsMap; //the contents of the PLIST file is stored as a map with key/value pairs
  NSString *dataFile; //reference to the filename

  NSArray *sections; //all the keys in the PLIST files are treated as sections in the table view controller
The implementation is a bit long, so we’ll go through them one by one. First of all, we’ll write the code for initWithDataFile method
- (id) initWithDataFile:(NSString*)_dataFile {
    self = [super init];
    if (self == nil)
        return nil;

    dataFile = _dataFile;

    NSString *dataPath = [[NSBundle mainBundle] pathForResource:dataFile ofType:@"plist"];
    contentsMap = [[NSDictionary alloc] initWithContentsOfFile:dataPath];
        sections = [[NSArray alloc] initWithArray:[contentsMap allKeys]];

    return self;
}
What we did here was to create an internal path for PLIST file. Then, create a NSDictionary using the method initWithContentsOfFile which holds all the data from the PLIST file. Finally, we create an array called sections in which we put all the keys of the PLIST file. The reason why we’re storing all the keys is because we want to use each of the keys as section header in our table view. Next, we write code that display data for the table view.
#pragma mark Table

// Each KEY in the PLIST file is a Section Header
- (NSString *)tableView:(UITableView *)tableView titleForHeaderInSection:(NSInteger)section {
    return [sections objectAtIndex:section];
}

// Customize the number of sections in the table view.
- (NSInteger)numberOfSectionsInTableView:(UITableView *)tableView {
    return [sections count];
}

// Customize the number of rows in a section
- (NSInteger)tableView:(UITableView *)tableView numberOfRowsInSection:(NSInteger)section {
    // no. of rows and no. of sections are the same
    return 1;
}

//Code for each cell row
- (UITableViewCell *)tableView:(UITableView *)tableView cellForRowAtIndexPath:(NSIndexPath *)indexPath {
     NSString *cellId = @"Cell";

     UITableViewCell *cell = [tableView dequeueReusableCellWithIdentifier:cellId];
     if (cell == nil) {
    cell = [[UITableViewCell alloc] initWithStyle:UITableViewCellStyleDefault reuseIdentifier:cellId];
     }

    NSString *key = [sections objectAtIndex:indexPath.section];
    NSString *value = [contentsMap valueForKey:key];

    cell.textLabel.font = [UIFont fontWithName:@"Helvetica" size:13.0f];

    //Check if this row is a password field
    bool isPassword = [key isEqualToString:@"Password"];
    bool isPin = [key rangeOfString:@"pin" options:NSCaseInsensitiveSearch].location != NSNotFound;

    if (isPassword || isPin) {
        cell.textLabel.text = @"**********"; //hide the cell text from plain view
        cell.userInteractionEnabled = YES;
    } else {
        cell.textLabel.text = value;
        cell.userInteractionEnabled = NO;
    }

    return cell;
}

//Selection for cell row
- (void)tableView:(UITableView *)tableView didSelectRowAtIndexPath:(NSIndexPath *)indexPath {
    NSString *key = [sections objectAtIndex:indexPath.section];
    NSString *value = [contentsMap valueForKey:key];

    //
    UIAlertView *alertView = [[UIAlertView alloc]
                              initWithTitle:@"Password"
                              message:value
                              delegate:nil
                              cancelButtonTitle:@"OK"
                              otherButtonTitles:nil,
                              nil];
    [alertView show];

    [tableView deselectRowAtIndexPath:indexPath animated:YES];
}
Finalizing bits & pieces
By now, we have application structure i.e. navigation controller, UI design i.e. two buttons, the PLIST display controller and the logic for wiring all of them up. One final thing to do here is to go back and change some of the codes in CSimplePimViewController. When a button is clicked, for ex: Bank A/C, the corresponding PLIST file should be loaded and displayed. The logic for this is already written in initWithDataFile method. Therefore, all we have to do is call the method.
- (IBAction)onBankAcClicked:(id)sender {
    CPListTableViewController *cPimController = [[CPListTableViewController new] initWithDataFile:@"netbank"];
    [cPimController setTitle:@"Bank A/C"];
    [self.navigationController pushViewController:cPimController animated:true];
}

- (IBAction)onGmailIdClicked:(id)sender {
    CPListTableViewController *cPimController = [[CPListTableViewController new] initWithDataFile:@"gmail"];
    [cPimController setTitle:@"Gmail ID"];
    [self.navigationController pushViewController:cPimController animated:true];
}
That’s it for this tutorial. Thank you for your time.
« Previous: Tutorial - Embed Lua in Java w/LibGDX and Box2D Next: Setting Up JadClipse and JAD Decompiler in Eclipse »
Setting Up JadClipse and JAD Decompiler in Eclipse
Sun Dec 9, 2012
Go to Preferences -> General -> Editors -> File Associations and associate .class and *.class without source *to Jadclipse File Viewer. Also make it default.
* *
*
Testing JadClipse
Double click a .CLASS file to see the decompiled data. The image below shows an example.

« Previous: Tutorial - Simple Personal Information Manager (PIM) for iPhone Next: Getting Started with Google Protobuf - 1 »
Getting Started with Google Protobuf - 1
Sat Dec 8, 2012
1. Setting up Google Protobuf - Compiling tools and API
Download Google Protobuf 2.4.1 from http://code.google.com/p/protobuf/downloads/list
Compile Google Protobuf
I’m using OSX Lion and Eclipse Juno. In OSX, before compiling you need to install command line tools. See here on how to do it. You can skip it, if you already have the command line tools installed. You can check if it is installed from Xcode 4 Preferences.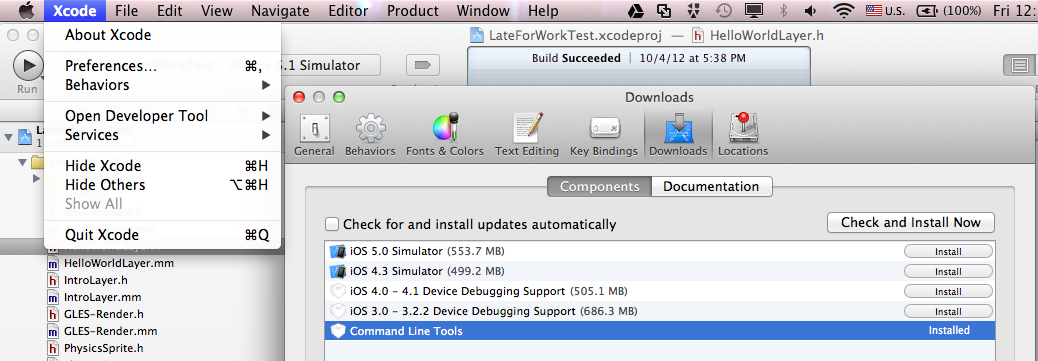
Continuing with the setting up, unzip the archive. Open terminal and change the directory to the unzipped directory and compile it using the following commands:
configure && sudo make install
The protobuf compiler is installed at /usr/local/bin/protoc
Create protobuf-2.4.1.jar API file
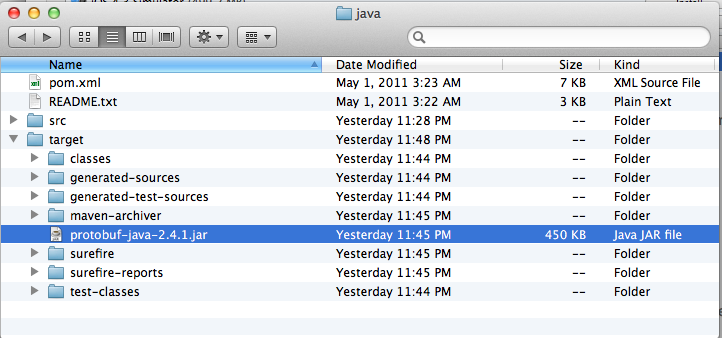
You’ll have to compile and bundle the Java API as well. The quickest way to do it is to use Maven to package the JAR file. Inside the protobuf-2.4.1 folder that you unzipped, open the terminal and change the directory to “java”. Use the following command to compile and bundle the JAR file:
mvn package
This process creates a target directory where you’ll find protobuf-java-2.4.1.jar file. This JAR file is the Java API for reading/writing protobuf messages in Java. Therefore, it is very important.
2. Setting up Google Protobuf - Eclipse plugin
Now, we create an eclipse plugin from existing JAR archive just like the way we did it here.
Create a new Eclipse plugin project from existing JAR archives
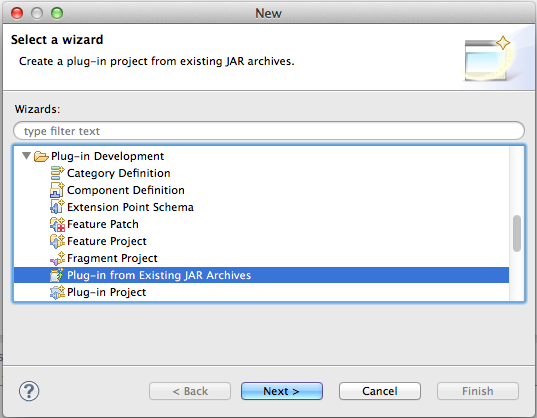
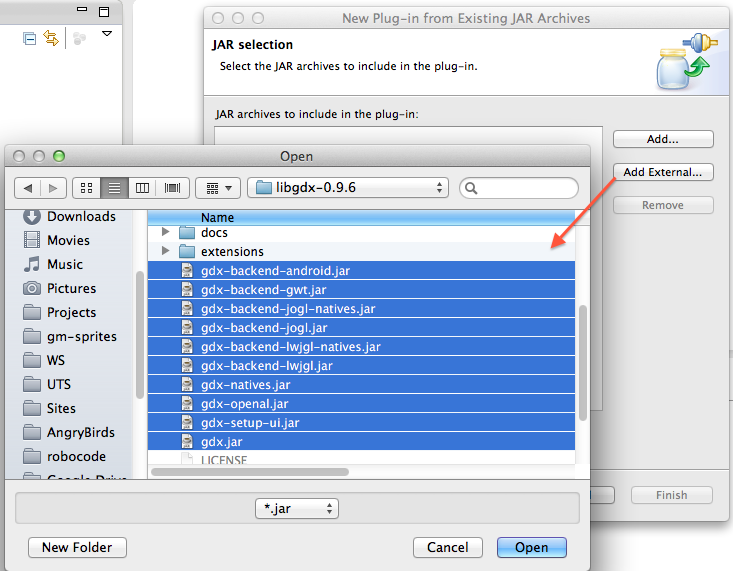
Add external JAR file protobuf-2.4.1.jar that we just compiled
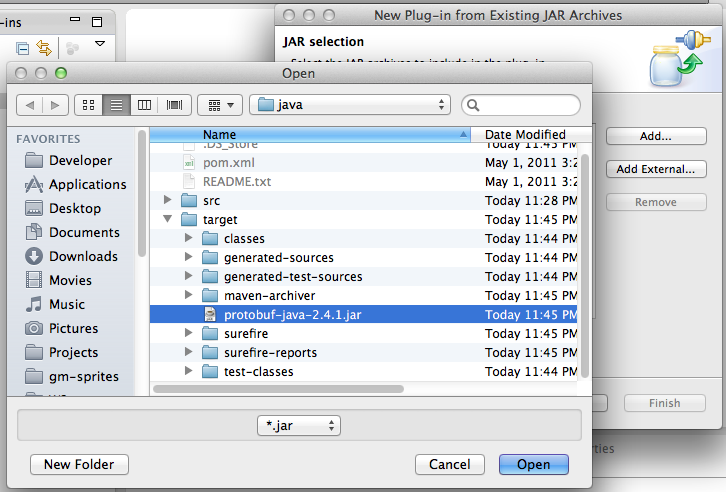
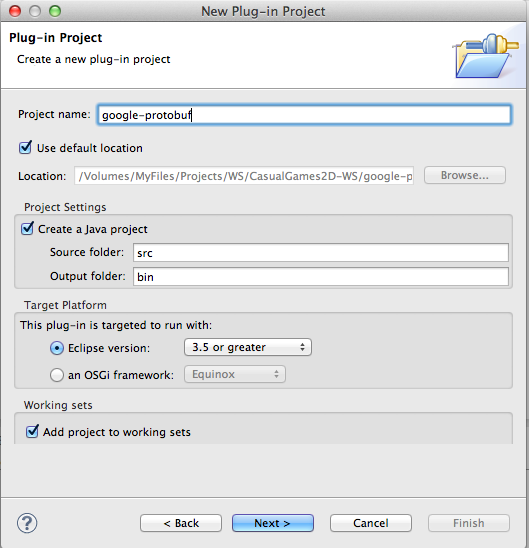
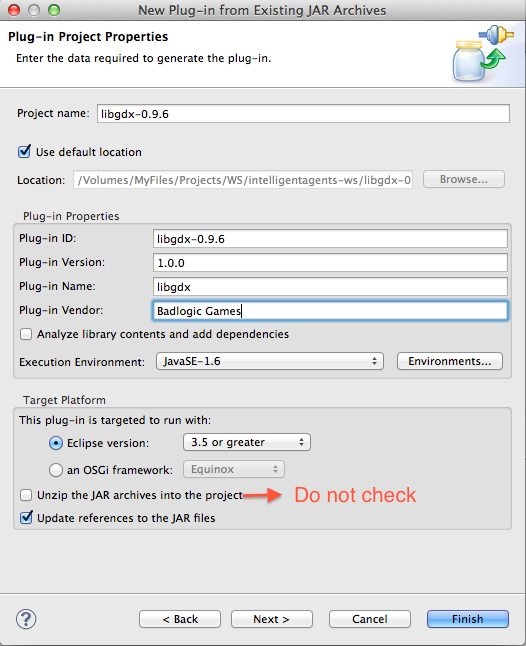
Enter name and version for the eclipse plugin
You should see the plugin in your package explorer now.
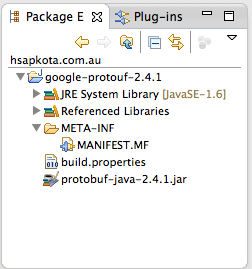
I’ve created a GitHub project for this plugin so that other users can use it without having to recompile the files.
That’s it for this part. In Part II , we’ll look in creating a RCP application and integrate the plugin we just created for serializing and deserializing data.
« Previous: Setting Up JadClipse and JAD Decompiler in Eclipse Next: Getting Started with Google Protobuf - 2 »
Getting Started with Google Protobuf - 2
Fri Dec 7, 2012
Before starting with this tutorial, you should ensure that you have WindowBuilder Pro installed from the following update site: http://download.eclipse.org/windowbuilder/WB/release/R201206261200/4.2/ . This link is for Eclipse Juno/Kepler 4.2/4.3. If you are using an older version of Eclipse, you should see here on how to install WindowBuilder for that version.
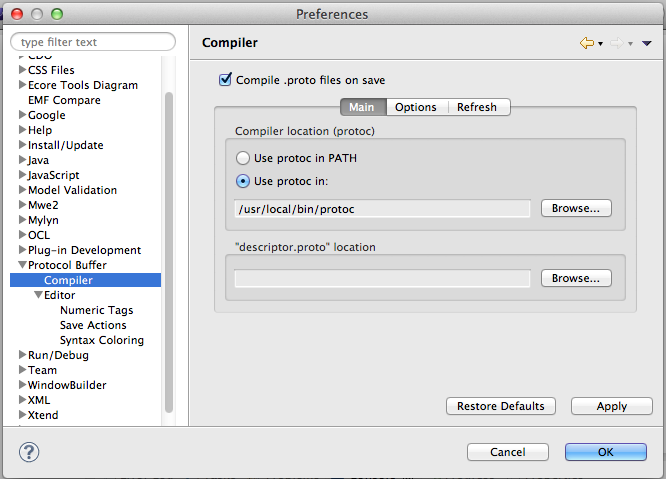
1. Install Protocol Buffer Editor and Set preferences
protobuf-dt is an eclipse plugin for creating, editing and compiling messages in Google Protobuf. You can install protobuf-dt from here: http://code.google.com/p/protobuf-dt/wiki/Installing . After the installation is complete, you should set some preferences for protobuf-dt as shown in the image below. The configuration shown in the image is specific for Mac OsX.
2. Create an Eclipse RCP application with a form editor [Advanced]
This section is going to be a bit lengthy and advanced. Here, we create an Eclipse RCP application that has the following features:
In the project/package explorer right click and create a new Plug-in Project named contacts-manager. Continue pressing the next button until you reach the Templates page. Select Hello RCP template and press the Finish button. This will result in the manifest editor for the project to open automatically as shown in the image below.
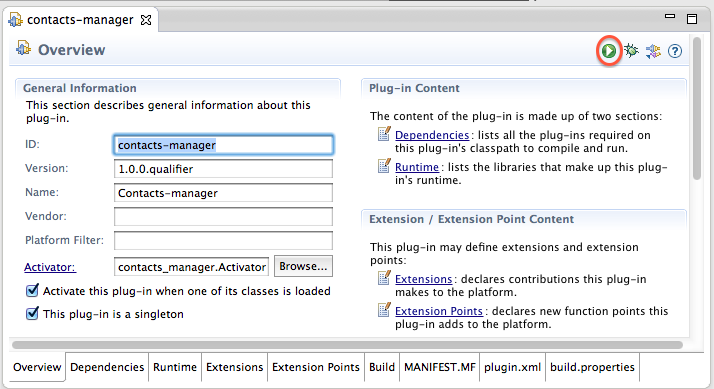
In the top right of the image, I’ve annotated the Run button. If you press the Run button, you should see an empty application window with the title Hello RCP. Next, We will add the Eclipse Common Navigator view in the application. Eclipse Common Navigator Framework allows you to create and manage projects/files in the workspace of your RCP application.
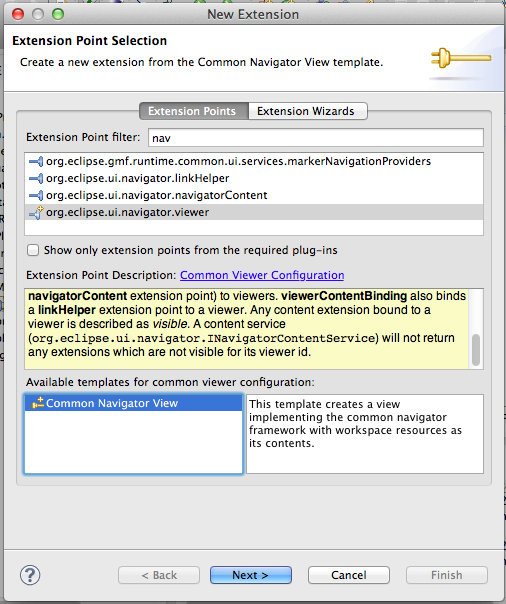
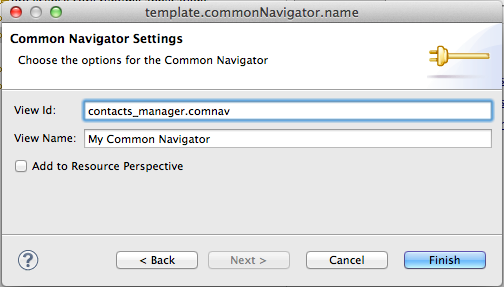
In the Manifest editor, click on the Extensions **tab and Add the org.eclipse.ui.navigator.viewer as shown in the images below. Essentially, we are adding a view to our RCP. Therefore, the view id is important to note. The view id that I set is *contacts_manager.comnav. *We will use this view id later.**
*
 *
*
Now, we need to write some codes to make the CNF show up properly in the RCP application. Open up ApplicationWorkbenchAdvisor.java and add the following two methods to it:
@Override
  public void initialize(IWorkbenchConfigurer configurer) {
    super.initialize(configurer);
    IDE.registerAdapters();
  }

@Override
public IAdaptable getDefaultPageInput() {
     IWorkspace workspace = ResourcesPlugin.getWorkspace();
     return workspace.getRoot();
}
Next, open up Perspective.java and add the following code to createInitialLayout method.
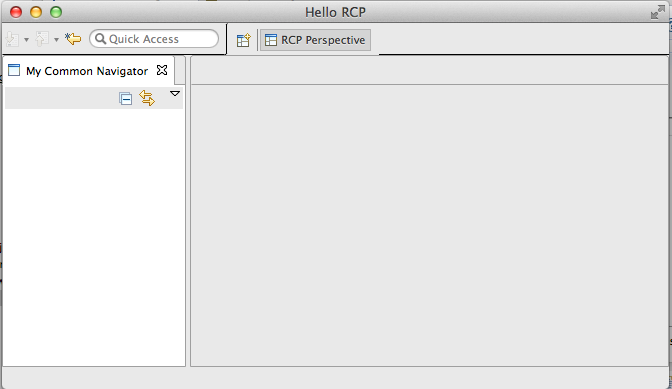
layout.addView("contacts_manager.comnav", IPageLayout.LEFT, 0.10f, layout.getEditorArea());
The code above adds the common navigator view to the perspective of our RCP application. If you run the RCP application now, it should look similar to the image below.
Next, we create an editor for managing simple contacts.
In the Dependencies tab of manifest editor, add org.eclipse.ui.forms as a dependency. Then, go to Extensions tab and add a new extension org.eclipse.ui.editors as shown in the images below. We’ll be using Multi-page Editor template, so don’t forget to select it as well.
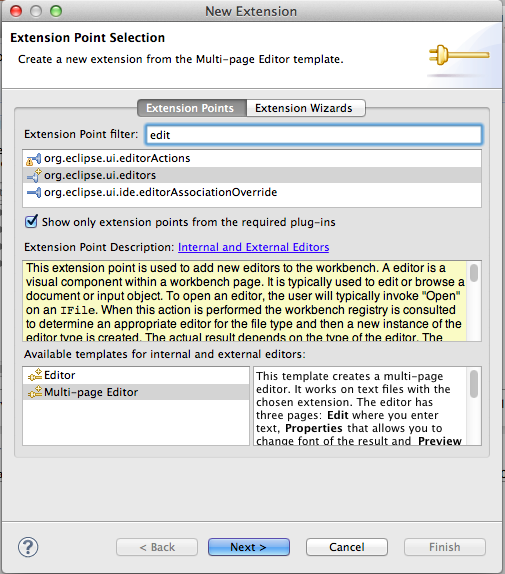
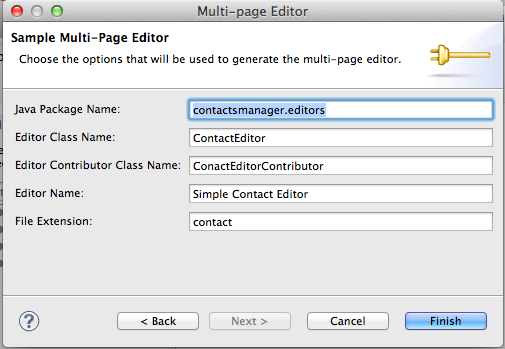
The template creates two files: ContactEditor.java and ContactEditorContributor.java. Because we’re creating an editor for managing simple contacts, we’ll remove all the template code and start with our own. Remove all the template code from ContactEditor.java and use the following code as the starting point. You might as well delete ContactEditorContributor.java because we won’t be using it. If you do so, don’t forget to remove the corresponding reference to it in the manifest file.
public class ContactEditor extends FormEditor {

    @Override
    protected void addPages() {
    }

    @Override
    public void doSave(IProgressMonitor monitor) {
    }

    @Override
    public void doSaveAs() {
    }

    @Override
    public boolean isSaveAsAllowed() {
        return false;
    }

}
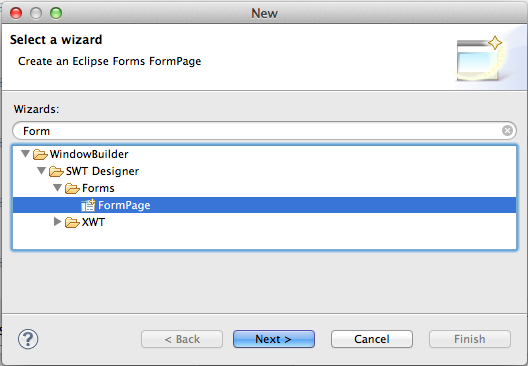
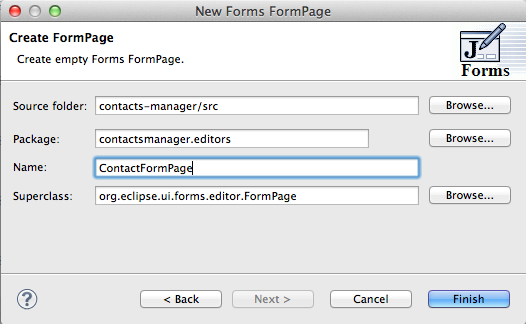
A Form editor is a collection of form pages. We’ll create a form page using Window Builder. As shown in the images below, create a new form page called ContactFormPage.java.
Using the Window Builder, we will create a simple form like below:
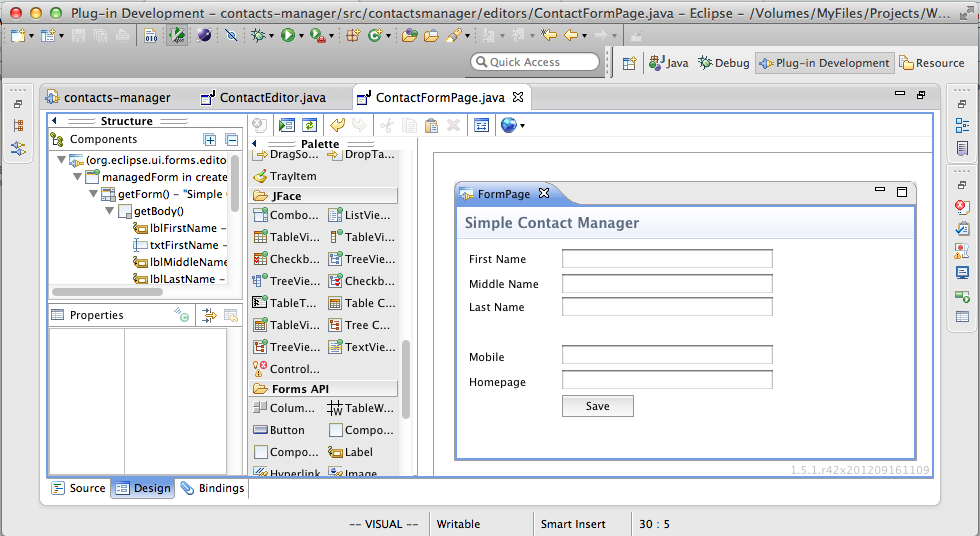
The following are the variable names for the text fields: txtFirstName, txtMiddleName, txtLastName, txtMobile, txtHomepage, and btnSave. We need to add this form page in the ContactEditor.java file. Update the ContactEditor.java file as below:
  public class ContactEditor extends FormEditor {

    ContactFormPage cfp;

    @Override
    protected void addPages() {
        try {
            cfp = new ContactFormPage(this, "ContactFormPage", "Contacts");

            addPage(cfp);
        } catch (PartInitException e) {
            e.printStackTrace();
        }
    }

    @Override
    protected void setInput(IEditorInput input) {
        super.setInput(input);

        setPartName("Simple Contact Editor");
    }

    @Override
    public void doSave(IProgressMonitor monitor) {
    }

    @Override
    public void doSaveAs() {
    }

    @Override
    public boolean isSaveAsAllowed() {
        return false;
    }

  }
Testing what we have so far
In the last section we covered a lot of information related to creating a RCP application with a common navigator; and a simple form editor. To test what we have so far, run the application and create a new project called addresses. In this project, create a new file called supervisor.contact. This is shown in image below.
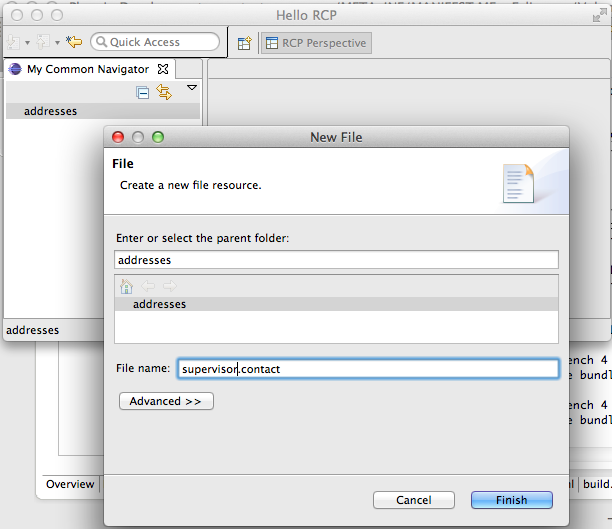
Click on the Finish button. You should now have the form editor open the contact file automatically as shown in the image below.
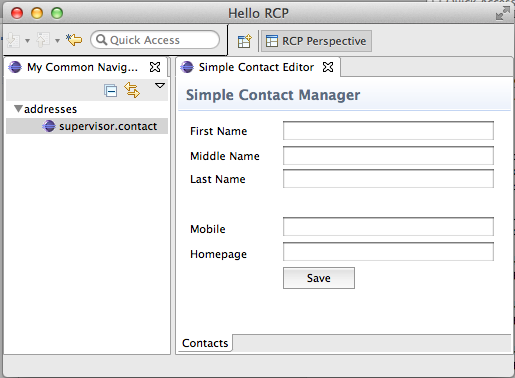
That’s it for this part. In the next and final part , we will focus on how to persist the data for the .contact file using Google Protobuf.
« Previous: Getting Started with Google Protobuf - 1 Next: Getting Started with Google Protobuf - 3 »
Getting Started with Google Protobuf - 3
Thu Dec 6, 2012
Creating a simple message in Google Protobuf - contact.proto
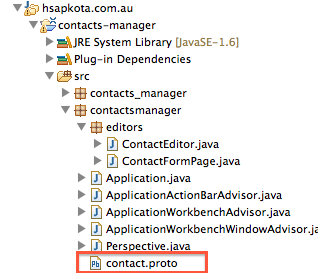
We’ll start off by creating the message or data format for our contact app. Create a new protocol buffer descriptor file using the new wizard, call it contact.proto and save it inside the contactsmanager package.
The contents of the proto file is below. The message itself is very simple. That’s because, our tutorial is very simple.
package contactsmanager.proto; //The package where the compiled version of this object is saved
// The name of the message. It is important not to give the same name as the proto file name// i.e. the message name Contact would not compile. This issue can be avoided by using the java_outer_classname option
message PContact {        //the optional keyword indicates that the field may or may not be set. When parsing this message, if optional value is not set, then default value is used
    optional string firstName = 1;
    optional string middleName = 2;
    optional string lastName = 3;
    optional string mobile = 4;
    optional string homepage = 5;
}
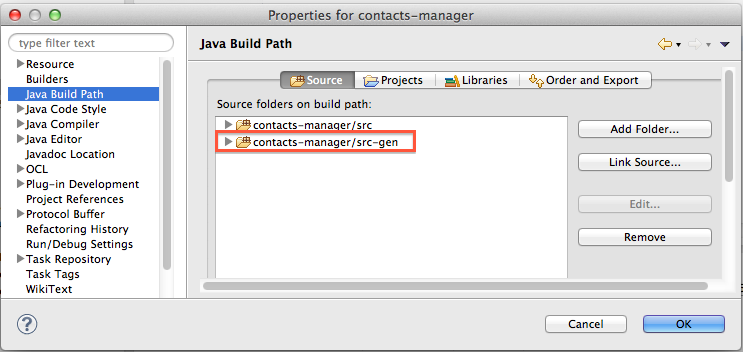
Once you save the .proto file, the protobuf compiler compiles it automatically and creates the corresponding java file for reading/writing to the message in you project folder. The folder it creates it: src-gen *You need to link up this folder as source folder so that when we use the PContact.java file, eclipse can include it automatically in the imports. Right click on the contacts-manager* project that we are working on and link up the src-gen folder in java build path. This is illustrated below.
Wiring the code for saving/reading data to protobuf format
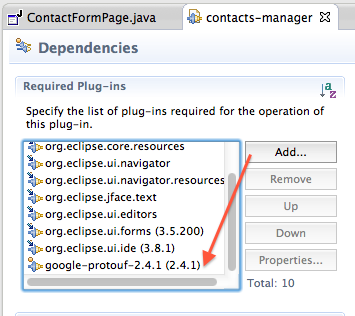
First thing we have to do is incude the google-protobuf-2.4.1 plugin in our contacts-manager rcp dependencies list.
Next, open up ContactFormPage.java in Window Builder moder. Double click on the save button. The builder automatically creates a click handler and switches to code mode. In the code create a new method called performSave().** Also, call the method *performSave() *inside the button event handler.
private void performSave() {
    String firstName = txtFirstName.getText().trim();
    String middleName = txtMiddleName.getText().trim();
    String lastName = txtLastName.getText().trim();
    String mobile = txtMobile.getText().trim();
    String homepage = txtHomePage.getText().trim();

         //the compiled java class has in-built builder for creating objects of the PContact class
        PContact contact = PContact.newBuilder().setFirstName(firstName)
                .setMiddleName(middleName).setLastName(lastName)
                .setMobile(mobile).setHomepage(homepage).build();

        //save the contents of contact (byte array) to file using eclipse resources api
    IFile file = ((FileEditorInput) getEditorInput()).getFile();
    ByteArrayInputStream baio = new ByteArrayInputStream(contact.toByteArray());
    try {
        file.setContents(baio, false, false, null);
    } catch (CoreException e) {
        e.printStackTrace();
    }
}
Now, we’ll create another method that loads the data from the file. Create loadContact() *and call the method inside createFormContent()* method.
@Override
protected void createFormContent(IManagedForm managedForm) {
    FormToolkit toolkit = managedForm.getToolkit();
    ScrolledForm form = managedForm.getForm();
    form.setText("Simple Contact Manager");
    Composite body = form.getBody();
    toolkit.decorateFormHeading(form.getForm());
    toolkit.paintBordersFor(body);
        .
        .
        .
        loadContact();
}

private void loadContact() {
    IFile file = ((FileEditorInput) getEditorInput()).getFile();
    try {
        PContact contact = PContact.parseFrom(file.getContents());

        txtFirstName.setText(contact.getFirstName());
        txtMiddleName.setText(contact.getMiddleName());
        txtLastName.setText(contact.getLastName());

        txtMobile.setText(contact.getMobile());
        txtHomePage.setText(contact.getHomepage());

    } catch (IOException e) {
        e.printStackTrace();
    } catch (CoreException e) {
        e.printStackTrace();
    }
}
Output
« Previous: Getting Started with Google Protobuf - 2 Next: Creating Eclipse Plugins From Existing Java Frameworks »
Creating Eclipse Plugins From Existing Java Frameworks
Tue Dec 4, 2012
Step 1: Download the latest LibGDX from http://libgdx.badlogicgames.com/download.html
Step 2: In Eclipse, create a new plugin project
Step 3: Next, you’ll have to provide links to the JAR archives of LibGDX
Step 4: In the next step, fill in some parameters like plugin name and version number
After having gone through all the steps, you should be able to see the LibGDX eclipse plugin in your package explorer.